1964 Falcon
Be sure to visit my other websites:
www.highdefinitionblog.com www.blogofhawaii.com www.highdefforum.com
1964 Falcon
Be sure to visit my other websites:
www.highdefinitionblog.com www.blogofhawaii.com www.highdefforum.com
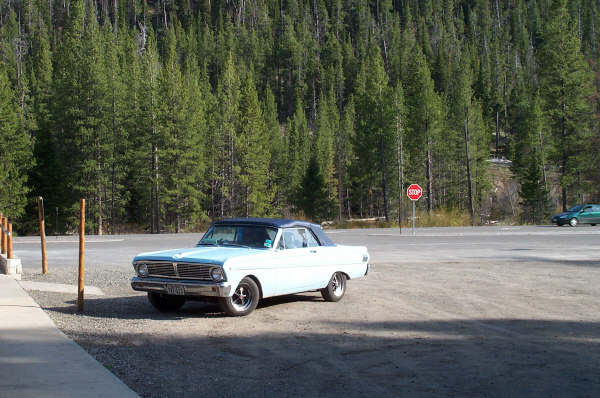
Well, let me tell you about my '64 Falcon. My 1964 Falcon started out life a six-cylinder, "three on the tree" Futura convertible with a front bench seat. It is quite different now, and I like to think it is for the better. The first time I knew anything about this car was when a fellow Falconer showed up with it at a car show in its original form. After getting a ride in it, I thought how much better feeling the ride was than my 1965 Mustang convertible. The car went away for several months and emerged with a whole new drive train. My friend had scrapped all of the six-cylinder parts and replaced them with new V-8 equipment, including a Lincoln Town Car 5.0 roller cam engine, retrofitted with the early model timing cover, front engine accessories, exhaust manifolds, distributor, intake manifold and four barrel carburetor. The transmission was a C4 three speed automatic unit. He wanted to sell the car and I was in the market for a convertible, so a deal was struck. At first the only thing I did to the car was to replace the bench seat with a pair of bucket units out of a wrecked Probe GT. Later I went to work in completely rebuilding the car.
Front suspension and brakes
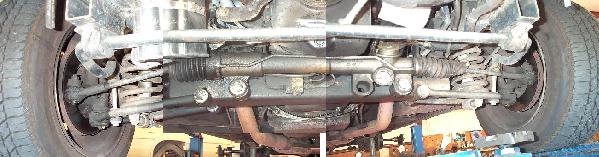
After driving the car with manual steering for several years I decided if I was going to keep the car, power steering was going to be required. I was also less than happy with the performance of Ford steering and front suspension. Plus you all know the problems with the shock towers being in the way of everything. Another friend of mine had just completed a project to put an aftermarket Mustang II type suspension under his '69 Mach I, and was very pleased with the outcome, so I decided this would be the answer for my Falcon. Out came the existing suspension and the dreaded shock towers and in went the Mustang II power rack and pinion steering based suspension with large disc brakes and gas shocks. Trust me, the time you spent reading about that conversion does not do it justice, it was a job! Here is a view of the front end and you can view more photos by clicking on the picture.
The power rack that came with the kit was from a '85 Pinto which has been changed to a Fox body '89 Mustang rack since the Mustang rack is readilly available and the Pinto is special order. The steering setup kit was furnished by Fat Man, which uses Ford spindles and '78 Granada rotors with mid size '74 Chevelle Malibu disc brake calipers and pads. Springs were furnished with the kit and are basically similar to what would be used in a Mustang II with a V-8. If I were to do the conversion over again, I would have chosen the coil over shock version which they also offer. The clearance between the springs and the brake calipers leave much to be desired, and as a matter of fact I had to add a stop to limit the steering travel to keep the brake lines out of the springs on extreme turns. The front brake hoses are also '74 Chevelle Malibu. Banjo bolts are Doorman (Help!) 13935 or 13938 can be used if shortened 3/16". The brake lines for the front brakes were custom run with new lines. The master cylinder and power booster was furnished by Master Power Brakes. The master cylinder utilizes dual cylinder technology, with separate connections for the front and the rear brakes.
Engine
I wanted a drivetrain, which would be extremely reliable as well as state of the art. Since I also owned a 1965 Ranchero truck which has a '87 H.O. 5.0 with automatic overdrive transmission, I liked the way I could set up the truck for months at a time, turn the key and it would start immediately. Not true with the carburetor, I would grind and grind to get the thing started, and then it would either run rich or lean until the carb had about two tanks of gas run through it. First I purchased an engine and transmission out of a Lincoln Mark VIII; you know one of those four valve 300HP numbers. After much languishing over the lack of room even with the shock towers removed, I decided I didn't want to remove the firewall and make other structural changes that would be necessary to get the engine in the engine bay. Believe it or not the Lincoln four cammer is like trying to put a big block SOHC motor in there, roughly the same physical size. Also the exhaust and engine accessories was going to be more problems, so the four cammer was abandoned and sold to friend of mine who is planning on putting it into a '62 Lincoln. Should be enough room in that car. Anyway, I liked the 5.0 that was in my truck and decided that would be a good engine for me. I went down to the local Ford dealer that dealt in a lot of Ford Motorsport parts and accessories and found they offered a new 5.0 complete engine, which was the '94-95 Mustang GT power plant. This offering was complete from oil pan to induction, flywheel to water pump, electrical wiring harnesses included. Well, it seemed like destiny so one was ordered, along with the computer, sensors and other wiring kits required to make it run. While I was there, I also added a pair of tuned length exhaust headers and a high performance headpipe with catalytic converters. You may be asking why the cats? Well I had in mind of shipping the car to Hawaii in the future and not knowing the emission rules about newer engines in older cars, I decided to build the car totally emissions legal to the '95 level. This turned out to be a great idea, because the computer is expecting all of the sensors and emission controls to be there, and even though you can make the engine run without many of them, the operation is much superior if they are all present. My truck was put together without any of the emission controls and sensors and it is a little cold natured and get far less gas mileage than the convertible. You would think that the extra weight and lower rear end gear on the convertible would cause the opposite to be true.
Engine compartment
In order to accommodate all for the late model accessories there were many changes required to the engine compartment. I wanted to use a late model radiator and air conditioning condenser so the engine and passenger cooling would not be compromised. The original Falcon radiator and the aftermarket condenser available for the stock radiator mounting would not do the job. I had determined this while the car had the 5.0 Lincoln engine installed. It may work fine in some parts of the country, but in Houston, Texas, the surface areas of the stock sized units would not keep up with the heat load. Additionally, I knew I was not going to use R-12 in the A/C and the extra size of a late model condenser would come in handy. I selected a 1986 Lincoln Town Car radiator and condenser to be used. In order to get all of the various mounting brackets and so forth required to get all of the various accessories installed, I acquired a 1986 Lincoln Town Car as a donor. There is not room in this writing to go through all of the reasons why every component was selected, but I will explain how the finished project was done.
After the engine and transmission was in place, I was ready to start mounting all of the engine accessories. Since the '86 Town Car engine accessories were totally different than the '95 engine I had, the water pump and timing chain cover supplied with the engine had to be abandoned and replaced with the '86 Town Car units. This allowed the '86 accessory brackets to be used along with the double belt system to drive the accessories. The harmonic balancer and belt drive pulleys were '86 units, along with the air pump, A/C compressor, alternator, and power steering pump. Of course all of the mounting brackets from the Town Car were cleaned and painted or re-coated. Out at the radiator support, the opening had to be enlarged by about 12 inches to accommodate the wider A/C condenser and radiator, both '86 Town Car. Mounting the units at a slight angle with the bottoms of the units forward accommodated the height. The '86 Town Car rubber mounts were used at the bottom and top of these components. The bottom mounts were glued to the frame and the top mounts were slightly modified and screwed to the radiator support. When mounted, it turned out that they ended up in the same relative position to the engine and transmission as the Town Car, allowing the use of the Town Car transmission cooling lines and lower radiator hose. The upper radiator hose used was a unit for a '87 Lincoln Mark VII, to accommodate the different engine connection on the '95 engine.
The air intake ducting was accomplished by using a combination of the rubber elbows from the Town Car and those included in the Ford sensor kit and hard plastic pipe acquired at the local hardware store. The air mass flow sensor was mounted on the passenger side inner fender, just behind the original battery well. The original battery well was used to house the air filter which is a K&N unit originally designed for a Ford 5.7L Lightening truck. Mounts directly on the mass flow sensor and with a supplied bracket at the front of the filter. The filter has to be cleaned in place due to the A/C lines which run above it, which is a small pain, but thankfully is not required that often.
Transmission
The 4 speed AOD transmission was taken from the '86 Town Car and completely rebuilt including a shift kit which allows shifting into overdrive under full power. I used a steering column out of a '66 Thunderbird, which allowed the use of the original Falcon shift linkage rod by lengthening the shift lever on the side of the transmission about 1". The TV cable was from a '88 Mustang GT, which mounted on the '86 Town Car bracket down at the transmission, and required a custom bracket to be fabricated up at the throttle connection.
Speed control
An aftermarket speed control kit used was a Rostra Universal Electronic Cruise Control 250-1223. The one thing, which was not supplied, was the speed sensor that they expected the original sensor in the side of the transmission to be used. This posed a problem, as there was not room for the sensor that mounted in the transmission. An in-line sensor from a '74 Galaxy was substituted under the dash (behind the speedometer) and worked just fine once I got the proper speedometer gearing installed. The sensor part number is D4AF9E731 and is available at Autozone. It requires a short speedo cable between the sensor and the speedometer which was gotten at RockAuto.com, their part number Y845.
The '66 Thunderbird column that was used originally came out of a car with the factory cruse control, so it had all of the buttons required for operating the speed control at a convenient location to operate the unit with your thumbs. The T-bird operation allowed for a 'Retard' feature that would place the cruse into 'coast' and slightly apply the brake. The brake feature is not yet installed, but I have made provisions to add this feature later. The 'Retard' button is used to place the cruise into coast.
To connect the T-bird buttons to the Falcon horn and the speed control required rewiring the buttons in the wheel to connect to a 4 Channel RF Wireless Remote Control Switch Receiver with Controller I bought from ebay. It has 4 relays which are operated by pushing a button on the remote fob. I wired the buttons in the wheel and the horn to the four buttons on the remote fob. The fob was then mounted to the underside of the steering wheel. One of the relays operated the horn and the other three are for the cruse control. The RF controller with the relays were mounted under the dashboard, and the throttle activator assembly is mounted on the left side of the engine compartment.
Rear Axel
A 9" rear axel was fitted and completely rebuilt with new wheel bearings, brake shoes, wheel cylinders, brake attaching hardware and drums. The third member is a limited slip carrier with 3.25:1 ring and pinion.
Air Conditioning
As was discussed earlier, the A/C compressor used was a '86 Town Car unit mounted on the passenger side of the engine. This allowed the use of the Town Car discharge line with the built in muffler between the compressor and the condenser. The other A/C lines were mostly custom built to accommodate the evaporator unit used inside the passenger compartment. An accumulator for a Ranger was selected and mounted behind the passenger side hood spring. The evaporator unit used was a Classic Air unit with heater and defroster options. Next the custom hoses were made to hook all of this stuff up. On the air duct side of the evaporator unit, there are connections for four outlets. The system assumes you will mount all four outlets under the dashboard. I wanted to make the installation to look a little more "factory" and decided to put the two center outlets in the place where the original radio was located. The other two were mounted under the dash at the far left and far right hand positions and a 4 inch extension was added below the existing dashboard to give the illusion the registers were built in to the dash. The controls are mounted in the console riser.
Interior
As was mentioned before, I had installed a set of Probe GT bucket seats and to complement them I had the rear seat upholstered with matching velour material. Additional matching material was applied to the door panels, quarter panels and front armrests. To provide a place to mount the radio, a '89 Lincoln Mark VII console was fitted into place. I even hooked up the rear heater vent outlets! While I was at it, I decided to include a digital clock with thermometer and voltmeter.
A GPS touchscreen radio with back-up camera is included in the riser as well as an equalizer in the console riser. Other openings that existed in the Lincoln bezels for the shifter, which would not be needed in my installation, was converted into a storage bin. Other changes to the dashboard included the installation of a 5-dial instrument cluster from a '66 Mustang. The Falcon radio bezel and glove box trim was retrofitted with black inserts and reinstalled. In order to use the Mustang gauges and speedometer in the cluster the installation of a '66 Mustang under dash wiring harness was used. This required the mating under hood to be changed as well. Fortunately, this wiring had been done when the previous owner had made the first V-8 conversion.
I did not like the possibility of my wife diving into the dashboard on a sudden stop, so I fitted a '65 Mustang padded dash cover into place. It required a minimum of modifications to the dash pad, as the Falcon and Mustang metal are virtually identical.
Fuel economy on our trip to Maine and back averaged 24MPG. Not bad for a 14 sec. car!
New Options Installed
Since the time of the original date of this page I have installed several new options including power windows, intermittent wipers with a Raintracker automatic controller, an auto dimming mirror with compass and garage door opener buttons and remote mirrors. For a page on the power windows see 1964 Falcon Power Windows Install
Be sure to visit my other websites:
www.highdefinitionblog.com www.blogofhawaii.com www.highdefforum.com